Remote Microscopy Guide: 6 Tips to Set Up Your Lab for Success
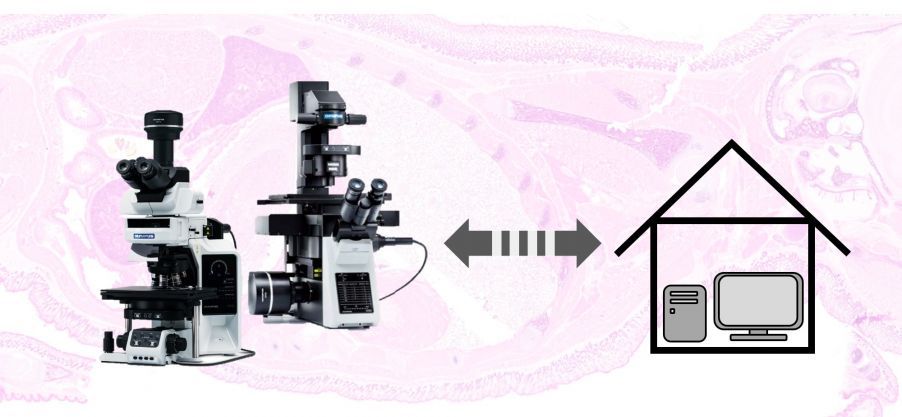
As more lab personnel work from home to practice social distancing, employees are using remote work IT platforms to communicate and stay productive. But this change in the way scientists and lab personnel work means labs must adapt their methods to fully leverage remote platforms. If you’re not sure where to start, this blog by Takeo Ogama, Senior Product and Strategy Planner and Product Manager at Olympus Corporation of the Americas can help.
Here are six tips to help you successfully implement remote microscopy:
1. Determine the IT platforms available in your lab.
Your remote operation capabilities strongly depend on the IT infrastructure in your lab.
As you plan for remote microscopy, first confirm which web meeting tools or software can be used, whether your institute has any network restrictions, and any other IT infrastructure considerations.
Also check to make sure there will be no unexpected interruptions from software. For instance, Windows update might run overnight, require a restart, and impact the remote operation. While you must follow your local IT policy, turning off the update can help prevent this issue.
2. Design your microscopic observation by identifying your current remote capabilities.
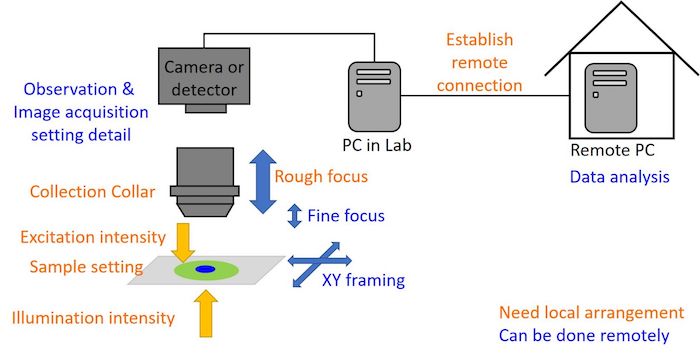
The next step is to plan and design your remote observation by identifying what can be done remotely and what must be done on site.
This can depend on your microscope and experiment. With fully motorized microscopes, you can generally walk away after setting up the observation, but please keep the following in mind as a general guide:
- What we should do locally: sample setting and focusing, collar correction, applying oil if needed, and setting up a remote environment
- What we can do remotely: operation after rough focus setting, fine adjustments for observation, and analyzing or sharing images
Even if your system can’t perform remote monitoring or operation, it’s worth studying the options vendors offer.
For instance, most professional microscopes are modularly designed and can be upgraded to a motorized system. Also, today there are many microscopy dedicated tools and general web meeting platforms for remote monitoring, image sharing, or microscope operation.
In general, we don’t recommend using oil for remote observation because it can be tricky to work with remotely. It can’t be applied remotely and could cause image quality issues and potentially damage your optics if too much is applied or it isn’t cleaned properly after use. However, one exception is using a research slide scanner that automatically dispenses oil. And for those who are familiar with oil use, pre-oiling (applying oil before starting the experiment) can be considered.
3. Adjust the parfocality.
We rarely realize the importance of parfocality adjustment when we observe through an eyepiece since it’s so easy and quick to adjust the fine focus after revolving the objectives. But when doing remote microscopy, parfocality between different magnifications becomes a critical component for smooth observation.
With the perfect parfocality setting, you won’t need to readjust the focus when switching magnifications. Refer to our quick procedure guide for parfocality adjustment with a camera. As the guide states, it’s important to adjust the parfocality through the eyepieces before you adjust the parfocality of the camera.
4. Check the stage flatness.
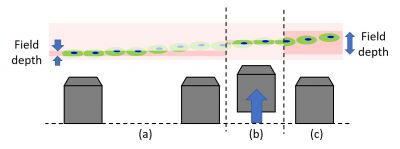
Stage flatness can’t be fixed remotely, and it can cause you to lose focus on the sample if it’s overlooked. The good news is that checking stage flatness is easy. Simply move the stage in the XY direction with high magnification, which has a shallow focal depth (explained later), when you’re in your lab.
If the stage flatness isn’t secured, the focal plane could shift against the sample Z-plane and eventually lose focus on the sample during the XY travel. While some third-party stage inserts have adjusting leveler screws, the Olympus insert is designed to provide a flat stage without adjustment.
5. Follow best practices for remote focusing in microscopy.
Focusing is one of the most challenging remote operations, and to make things worse, it’s irreversible if you crash into the sample with an objective and damage your sample or optics. Even in the best-case scenario where the sample falls off the sample holder of an inverted microscope—this issue can’t be fixed remotely.
So, how can you avoid those events? Follow these five general rules for remote focusing:
- Monitor carefully: This is easier said than done. The critical bottlenecks are the frame rate of the live image and the delay from the actual Z movement. However, there are a few ways you can improve them. First, binning or subsampling of the image acquisition setting is a general way to improve the frame rate. The frame rate and delay might also be limited due to the web conferencing tool you’re using. Some web conferencing tools have a settings menu to adjust the image quality and speed. We recommend you prioritize speed, particularly when you’re searching the focal plane.
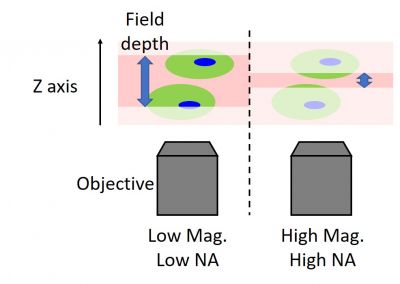
- Use a step-by-step approach with a wider depth of field: This approach can help you avoid the situation where every image is outside the depth of field and you can’t see anything. If an image is extremely defocused, it can be impossible to judge whether you should move the focus higher or lower. For this reason, try to avoid losing focus on the target outside of the depth of field. The depth of field is determined with the numerical aperture (NA). A high NA objective has a shallow depth of field. Therefore, we recommend you adjust focus starting from low NA to high NA, usually from low magnification to high magnification. When using a confocal microscope, the similar analogy of “deeper depth of field” can help. Because a smaller confocal aperture leads to a shallower depth of field, try a wider aperture to identify and focus on the target when you can’t find the sample or the sample is too dim. After precise focusing, set the appropriate confocality and laser power for the image acquisition.
- Approach from afar: As mentioned above, crashing into your sample is a worst-case scenario that you should always try to avoid, so it is important to approach carefully from a distance. If you’re using an inverted microscope, approach from the bottom side. For upright microscopes, approach from the upper side. When you move XY drastically, it’s worth moving the objective before moving the stage.
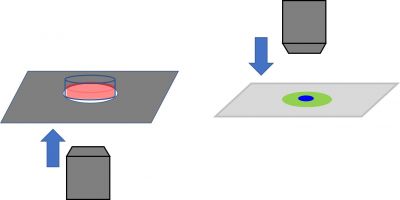
Figure 3. (Left) Approach samples from the bottom side for inverted microscopes and (right) from upper side for upright microscopes.
- Imagine the 3D shape of the sample: Your sample might not exist in same Z-plane at different XY positions, and you could lose focus on the sample when you move too far. This could be caused by the sample itself or by the stage flatness as mentioned above. When using a high-NA objective with a shallow depth of field, it’s better to move the XY slightly and adjust the Z carefully, not traveling too far without simultaneous focusing. When you lose focus, switch to a wider depth of field setting if possible. If you are creating a tiled image, the focus map can help you set the focus height information
- Remember the focus limit: To protect your sample and equipment, a focus limit might have been applied. For those who are unfamiliar, the focus limit feature limits the movable range of Z. Usually you don’t need to change the focus limit. But if someone changed the setting or if you’re using an unusually thick sample like a vessel with a tall bottom, the focus limit feature might prevent you from getting close enough to your sample for observation. Please note that the focus limit setting can only be done locally because we need to observe the physical distance between an objective and a sample.
Although we described tips for remote focusing here, another good approach is to automate focusing. You can learn more about automated focusing in our blog post, 4 Tips to Achieve Longer Live Cell Imaging with Less Time in the Lab.
6. Use a map to identify the XY position.
Another challenge of remote observation is that you can lose the sense of where you’re observing. This is caused by the combination of a limited frame rate, delay on the live image, limited FOV, and lack of direct visibility on the microscope stage.
A helpful solution is to use a map. With a configuration of the motorized stage, you can easily create a map with low magnification. It’s worth spending a little more time to create a map since it can enable you to immediately and continuously identify where you’re observing, and more importantly, you can jump anywhere you want just by clicking a position in the map.
Subscribe to any of our newsletters for the latest on new laboratory products, industry news, case studies and much more!
Popular this Month
Top 10 most popular articles this month
Today's Picks
Looking for a Supplier?
Search by company or by product
Please note Lab Bulletin does not sell, supply any of the products featured on this website. If you have an enquiry, please use the contact form below the article or company profile and we will send your request to the supplier so that they can contact you directly.
Lab Bulletin is published by newleaf marketing communications ltd.